How to optimize the title, meta description, and keyword placement for a blog or page

Whether you run a small business site or publish blogs weekly, getting your page title, meta description, and keyword placement right can noticeably improve search visibility and click-through rates. This practical guide shows you exactly what to change, how to verify it, and how to measure results—without platform lock-in.
- Difficulty: Easy–Moderate
- Time: 15–30 minutes per URL to implement; 2–4 weeks to gauge impact in Google Search Console
- Prerequisites: Access to your CMS or HTML files; basic ability to view source; Google Search Console (optional but recommended)
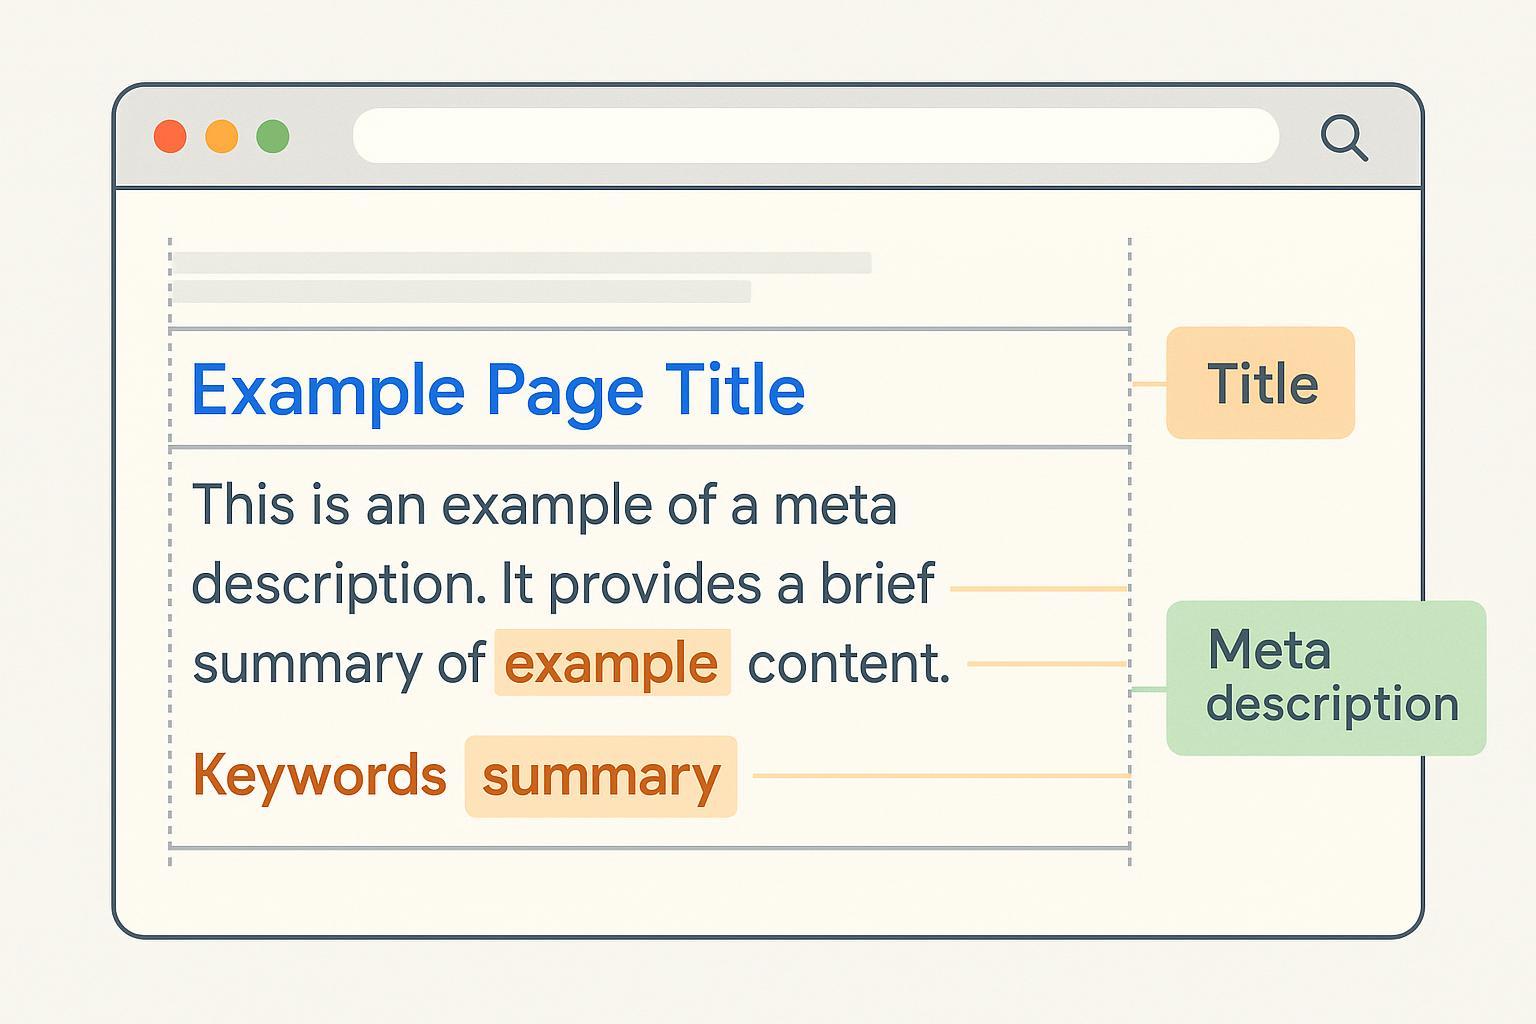
Step 1: Craft a clear, descriptive title tag (title link)
Your HTML <title> is what Google often displays as the blue link in search results. Make it descriptive, specific to the page, and aligned with the on-page content.
Do this:
- Put the primary topic term early while keeping it readable.
- Write for users first; avoid keyword stuffing and boilerplate.
- If helpful, add your brand at the end—“ | BrandName” or “ – BrandName.”
- Aim for concise display: roughly 50–60 characters or about ≤600px. Treat this as display guidance, not a rule.
Why this works:
- Google may rewrite titles when tags are vague, stuffed, or misaligned with on-page headings and content. A clear, page-specific title reduces rewrite likelihood, as explained in Google’s guidance on influencing title links (Google, 2025).
Templates you can copy:
- Informational:
Primary Topic: Clear Benefit or Context | Your Brand - Transactional (product/service):
Product Name – Key Attribute or Use Case | Your Brand - Local:
Service in City, State – Outcome or Specialty | Your Brand
Verification:
- View source and confirm one
<title>exists and matches your intent. - Preview truncation with a SERP simulator; check that the core meaning shows up front. A practical option is the SERP preview tool by Spotibo.
- Run a live Google query (incognito) to see current display; expect variability by query.
Common pitfalls to avoid:
- Duplicated titles across many pages.
- Overlong titles that bury the core message.
- Boilerplate like “Home” or “Blog” without specifics.
Step 2: Write a concise, value-forward meta description
Meta descriptions don’t directly influence rankings, but they influence whether users click. Write a short, accurate summary that matches searcher intent. Know that Google may replace your description with a snippet from the page if that better matches the query, per Google’s meta description guidance (2025).
Do this:
- Lead with the value or outcome in the first ~120–140 characters to survive most truncations.
- Keep it unique per page; mirror the page’s main intent.
- Include key details when relevant (author, date, product feature, price, availability) to help decision-making.
Optional snippet controls (advanced):
nosnippetblocks any snippet entirely.max-snippet:NNlimits snippet length.data-nosnippetexcludes specific element text from snippets.- These are documented in Google’s robots meta tag specifications (2025).
Templates you can copy:
- Informational:
Learn how to [solve problem] with step-by-step instructions, examples, and a verification checklist. Perfect for beginners. - Product/service:
Compare features, see pricing, and discover how [product/service] helps you [benefit]. Free trial and fast onboarding. - Local:
Get reliable [service] in [City, State]. Transparent pricing, quick scheduling, and friendly support.
Verification:
- View source to confirm
<meta name="description" content="...">is present and unique. - Check how it renders in a SERP simulator for desktop and mobile.
- Observe live snippets on Google; they may change depending on the query.
Step 3: Place keywords naturally across page elements
Keyword placement should help users understand your content—not be a checklist to game rankings. Focus on clarity and topical coverage.
Place keywords here (naturally):
- Title tag: Include the primary topic term early.
- H1: Mirror or use a close variant of the main topic; keep it clear which text is the page’s main title.
- First paragraph: State the core intent/topic succinctly; this helps snippet formation if Google rewrites.
- H2/H3 headings: Use related terms and variants to organize subtopics.
- Image alt text: Write descriptive alt text that reflects the image’s content and context; avoid stuffing.
- URL slug: Keep it short and human-readable; include the primary term where it fits naturally.
- Internal links: Use descriptive anchor text that tells users what the linked page covers; avoid “click here.”
Important notes:
- Google does not use the
meta keywordstag. See Google’s SEO Starter Guide (2025). - Use meaningful headings and a logical hierarchy for better UX, also covered in the Starter Guide.
- For images, follow Google Images best practices (2025) to write helpful alt text.
Helpful internal reads:
- If you need a primer on title/description/keywords basics (TDK), see Understanding and Implementing TDK for SEO.
- For topic-first writing and variants, read What are keywords, topics, and differences?.
- For broader meta tag syntax, check Master SEO with HTML CSS Meta Tags.
Step 4: Verify implementation and display
Do this on each URL:
- Confirm tags: In source, check for one
<title>and a unique<meta name="description">. Ensure a single clear H1. - Preview: Use a SERP simulator to test desktop/mobile truncation. Prioritize getting the core value message within the early characters/pixels.
- Live check: In an incognito Google search, inspect how the snippet appears for a few queries; note differences.
Step 5: Measure outcomes in Google Search Console
Your primary KPI after optimizing titles and meta descriptions is CTR. In GSC’s Performance report, track clicks, impressions, CTR, and position, and compare pre/post periods.
Do this:
- Record a 28-day baseline for the URL (clicks, impressions, CTR, average position). Annotate the change date.
- After 2–4 weeks, use Compare date ranges to evaluate CTR change and queries with high impressions but low CTR.
- This process is described in Google’s Search Console Performance report documentation (2025).
Troubleshooting: If X, then Y
- If Google rewrites your title:
- Reduce boilerplate and keyword repetition; make the title descriptive and page-specific; align the title with H1 and early content. Guidance: Influencing title links (Google, 2025).
- If your meta description is ignored:
- Improve the first paragraph to succinctly answer the core intent, then rewrite the meta description to summarize that answer. Guidance: Meta descriptions in Search (Google, 2025).
- If CTR doesn’t improve after 4 weeks:
- Test alternate phrasing that emphasizes unique value (benefits, numbers, qualifiers); consider adding brand for trust; verify that the query intent matches the page content.
- If snippets show sensitive or irrelevant text:
- Exclude it with
data-nosnippeton those elements or considernosnippet/max-snippet. See Robots meta tag specs (Google, 2025).
- Exclude it with
Industry-specific tips
- Blogs and SaaS content:
- Emphasize clarity and benefit in titles; test brand at the end when trust matters. Lead meta descriptions with the concrete outcome.
- E-commerce:
- Include product name, key attribute (size, color, material), and availability/pricing cues in the meta description. Avoid repetitive boilerplate across variants.
- Local businesses:
- Include city/state and a differentiator (response time, guarantee). Keep NAP consistency elsewhere; don’t stuff city names in every heading.
A neutral, replicable workflow example (editor + preview)
You can draft and preview metadata in many tools. One option is QuickCreator. Disclosure: QuickCreator is our product.
Example flow:
- In your editor, outline the page’s main intent and unique value. Draft a title that places the primary term early and a meta description that leads with the benefit.
- Use an integrated or external SERP preview to check pixel-width truncation for desktop and mobile. Adjust wording so the value appears up front.
- Check keyword placement: confirm the H1 mirrors the title’s intent, early paragraph states the topic clearly, and headings/alt text are descriptive.
- Publish and verify tags in source; then monitor CTR and impressions in GSC over 2–4 weeks.
Copyable snippets and checklists
HTML head (basic):
<head>
  <title>Service in City, State – Fast, Reliable Same-Day Help | BrandName</title>
  <meta name="description" content="Book fast, reliable [service] in [City, State]. Transparent pricing, same-day availability, and friendly support.">
  <!-- Optional snippet controls -->
  <meta name="robots" content="max-snippet:160, max-image-preview:large">
</head>
QA checklist (use before publish):
- Title is unique, descriptive, and places the main term early; no stuffing.
- Meta description is unique and value-forward in the first ~120–140 characters.
- One clear H1; logical H2/H3 hierarchy; early paragraph states intent.
- Descriptive image alt text; short, readable URL slug.
- Internal links use descriptive anchors relevant to the target page.
- Verified display with a SERP preview; core message is visible early.
- Baseline recorded in GSC and change date annotated.
Further learning
- For crafting stronger intros and value-first summaries that help snippets, see How to Write a Compelling Blog Style Essay.
Next steps (optional)
If you want an editor that supports drafting titles/meta, previewing, and multilingual optimization alongside a simple publishing workflow, you can try QuickCreator. Focus on iterating titles and descriptions over a few weeks, guided by GSC CTR and impressions.
References (authoritative and selected heuristics):
- Google guidance on titles: Influencing title links (Google, 2025)
- Google guidance on meta descriptions/snippets: Meta descriptions in Search (Google, 2025)
- Robots meta tag and snippet controls: Robots meta tag specs (Google, 2025)
- Headings/keywords fundamentals: SEO Starter Guide (Google, 2025)
- GSC Performance measurement: Search Console Performance report (Google, 2025)
- Heuristic display planning: Title tag length guidance (Search Engine Land, 2024) and Meta description pixel analysis (Spotibo, ongoing)